Ankle & Lower leg Assessment
Observation
Bilaterally assess for:
-gross deformity -bleeding -bruising -swelling -abnormal sound or crepitus in the ankle
-gait discrepancies/difficulty walking -medial or lateral tibial torsion
Bilaterally assess for:
-gross deformity -bleeding -bruising -swelling -abnormal sound or crepitus in the ankle
-gait discrepancies/difficulty walking -medial or lateral tibial torsion
|
Palpation

http://www.methodistorthopedics.com/shin-splints
http://www.uofmhealth.org/health-library/tp13087
|
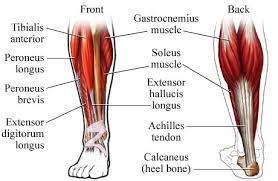
Bony:
-Fibular head -Fibular shaft -Lateral malleolus -Medial malleolus -Tibial plateau -Tibial shaft -Dome of the Talus -Calcaneus Soft-tissue: -Peroneus longus muscle/tendon -Peroneus brevis muscle/tendon -Anterior talofibular ligament -Calcaneofibular ligament -Posterior talofibular ligament -Flexor digitorum longus tendon -Deltoid ligament -Tibialis Anterior muscle/tendon -Extensor digitorum longus muscle/tendon -Gastrocnemius muscle -Achilles tendon |
Range of Motion
Dorsiflexion
Normative values: 20 degrees
Patient Position: Hook seated with foot in neutral
Fulcrum: Lateral aspect of lateral malleolus
Proximal Arm: Lateral midline of the fibula
Distal Arm: Lateral aspect of the 5th MT
End Feel: Firm
Plantarflexion
Normative values: 40-50 degrees
Patient Position: Hook seated with foot in neutral
Fulcrum: Lateral aspect of lateral malleolus
Proximal Arm: Lateral midline of the fibula
Distal Arm: Lateral aspect of the 5th MT
End Feel: Firm
Inversion(Tarsal Joints)
Normative values: 30-35 degrees
Patient Position: Hook seated with foot in neutral
Fulcrum: Over the anterior aspect of the ankle between the malleoli
Proximal Arm: In line with the tibial tuberosity
Distal Arm: In line with the 2nd ray
End Feel: Firm
Eversion(Tarsal Joints)
Normative values: 11-12 degrees
Patient Position: Hook seated with foot in neutral
Fulcrum: Over the anterior aspect of the ankle between the malleoli
Proximal Arm: In line with the tibial tuberosity
Distal Arm: In line with the 2nd ray
End Feel: Firm
Inversion (Subtalar Joint/Rearfoot)
Normative values: 5 degrees
Patient Position: Prone with foot in neutral
Fulcrum: Over the posterior aspect of the ankle between the malleoli
Proximal Arm: In line with the posterior midline of the lower leg
Distal Arm: In line with the posterior midline of the calcaneus
End Feel: Firm
Eversion (Subtalar Joint/Rearfoot)
Normative values: 5 degrees
Patient Position: Prone with foot in neutral
Fulcrum: Over the posterior aspect of the ankle between the malleoli
Proximal Arm: In line with the posterior midline of the lower leg
Distal Arm: In line with the posterior midline of the calcaneus
End Feel: Firm
https://www.youtube.com/watch?v=prcK_1oh0-U
Manual Muscle Tests
|
https://www.youtube.com/watch?v=re6uZ0uO0L8
https://www.youtube.com/watch?v=Yu172PqDRNA
|
https://www.youtube.com/watch?v=lLPlcCMJGl8
|
Plantar Flexion (Weight Bearing)
Patient Position: Standing on test leg with knee extended (gastrocnemius and soleus) or knee flexed (soleus) and foot flat on the floor
Stabilize: Patient's weight provides stabilization
Patient Action: Plantar flex ankle to raise themselves on toes
Resistance: Patient's weight provides resistance
Gravity Eliminated Position:
Side lying on testing side. Stabilize over anterior aspect of leg and have patient plantar flex foot
Muscles Tested: Gastrocnemius and Soleus
Grading Scale: 5) Patient is able to raise heel through full ROM 4-5 times
4) Patient is able to raise heel through full ROM 2-3 times
3) Patient is able to raise heel through full ROM 1 time
Plantar Flexion (Non-Weight Bearing)
Patient Position: Prone with knee extended (gastrocnemius and soleus) or knee flexed (soleus) and ankle in neutral
Stabilize: Anterior aspect of distal leg
Patient Action: Plantar flex ankle through full ROM
Resistance: Applied on superiorposterior aspect of calcaneus and plantar surface of foot
Gravity Eliminated Position: Same as Weight Bearing
Muscles Tested: Gastrocnemius and Soleus
Ankle Dorsiflexion and Subtalar Inversion
Patient Position: Hook seated
Stabilize: Posterior aspect of distal leg
Patient Action: Moves foot into dorsiflexion and inversion
Resistance: Over dorsal surface of medial side of the foot
Gravity Eliminated Position:
Supine. Stabilize over posterior aspect of distal leg and have patient dorsiflex and invert foot
Muscles Tested: Tibialis Anterior
Subtalar Inversion
Patient Position: Side lying on the test side
Stabilize: Over anteromedial aspect of tibia
Patient Action: Inverts foot through full ROM
Resistance: Applied over medial aspect of foot
Gravity Eliminated Position:
Supine. Stabilize over anteromedial aspect of tibia while patient inverts foot through full ROM
Muscles Tested: Tibialis posterior
Subtalar Eversion
Patient Position: Side lying on unaffected side
Stabilize: Medial aspect of distal leg
Patient Action: Everts foot through full ROM
Resistance: Against lateral border and plantar surface of foot. Plantar surface of the head of the 1st MT (Peroneus longus). Lateral border of foot along shaft of 5th MT (Peroneus brevis).
Gravity Eliminated Position:
Supine. Stabilize over medial aspect of tibia while patient enverts foot through full ROM
Muscles Tested: Peroneus longus and brevis
Special Tests
|
Anterior Drawer
•Pt Position: hook seated or long seated •Your Position: in front of patient •Action: Stabilize tibia and fibula and pull the foot anterior •Positive Indication: Pain with gapping and laxity between the talus and fibula •Implication: Anterior talofibular ligament sprain Talar Tilt •Pt Position: hook seated •Your Position: in front of Pt •Action: Stabilize tibia and fibula and invert or evert the foot to test desired ligaments •Positive Indications: Increased Pain and ROM, laxity and gapping •Implications: Deltoid Ligament Sprain(Eversion) Anterior talofibular ligament (inversion with plantar flexion) Calcaneofibular ligament(inversion with foot in neutral) Posterior talofibular ligament(inversion with dorsiflexion) Kleiger's Test •Pt Position: hook seated •Your Position: in front of patient •Action: Stabilize tibia and fibula, apply axial load on calcaneus and externally rotate the foot •Positive Indication: Pain and increased laxity on medial aspect of ankle •Implication: Syndesmotic ankle sprain (ER with dorsiflexed foot) Deltoid ligament sprain (ER with foot in neutral) Swing Test •Pt Position: supine •Your Position: in front of patient •Action: Place thumbs on talus and passively DF and PF foot •Positive Indication: Resistance into DF •Implication: Posterior tibiotalar subluxation Long Bone Compression Test Pt Position: Supine or long seated •Your position: Next to Pt •Action: Apply compressive force along bone being tested (not at Fx site) •Positive Indication: Pain at Fx site •Implication: Fx Thompson Test •Pt Position: prone •Your Position: beside Pt •Action: Squeeze belly of calf •Positive Indication: No PF of foot •Implication: Achilles' Tendon Rupture Homan's Sign •Pt Position: supine •Your Position: beside Pt •Action: Palpate calf belly while DF the foot and flexing the knee •Positive Indication: Palpable bump/heat in the calf, pain reported by patient •Implication: Thrombophlebitis/DVT |
https://www.youtube.com/watch?v=zjauu5gXF2A
https://www.youtube.com/watch?v=Ow8Y-HJwGqA
https://www.youtube.com/watch?v=ily_by5vAo8
https://www.youtube.com/watch?v=_QOIUpmSEjw
https://www.youtube.com/watch?v=pS6HsRipO2s
https://www.youtube.com/watch?v=8kxPFjSJj0k
https://www.youtube.com/watch?v=qKs8X4CMu5Y
|
